Saturday, February 28, 2009

Budget Bridal Attire

Wedding Attire.

So you just got engaged and you started buying all of the bridal magazines with page, after page, after page of lovely gowns to drool over. Then you start looking up the price tags of those lovelies and your heart sinks a bit. It happened to me. I fell in love with every big name in the business...but couldn't stomach spending more than 2 months rent on a dress.

I was lucky enough to find my dress at a sample sale. This is always a good avenue to try...but sometimes the repair and alterations bring the overall cost right back up to ridiculous.

But there is good news for you new brides-to-be. I've been noticing that a lot of my go-to cocktail dress designers are starting to include many more options that would be perfectly acceptable for a wedding gown...at great prices. Below are some of my favorites that I've found recently that range from $250 - $700. So don't forget to think outside of the box when shopping for your dress. Your pocketbook will thank you!


Aqua - $248
Vera Wang Lavender Label - $695

Friday, February 27, 2009

Savvy Splurge

Etsy Find.

There are few things that I love more than a spa day. I have my favorite spots in Manhattan that take me away from the rat race and allow me to escape to a soothing, lovely-scented, relaxing paradise. But because I have yet to pick those elusive Mega Millions numbers, I cannot indulge in the spa as often as I would like. So instead, I'm seeking out products that will transform my teensie bathroom into my own little getaway.

As you have probably gathered, the Hip Hostess ladies are big on packaging. I like my products to smell good, work well, and look gorgeous. Normally that comes with a hefty pricetag...but we found another Etsy gem. Sweet Petula has a wonderful assortment of bath products from soaps, to salts, to lotions...and everything is packaged just beautifully. I think they would make a lovely addition to any home spa - aka bathroom. And at very affordable prices, I won't feel the least bit guilty about my indulgence.

Thursday, February 26, 2009

Go Bananas

Food.

I know, I know, food again. But these are so cute, I couldn’t resist. I am a sucker for a dessert in a jar and when it is a childhood favorite what could be better? Hip Hostess has served chocolate mousse in a jar complete with a lid and ribbon which gets a great response and is perfect for a bridal or baby shower. I can’t wait to try this recipe from Screen Doors and Sweet Tea: Recipes and Tales from a Southern Cook as an alternative. I love the bright color, the Nilla wafer polka dots and the meringue topper pulls the whole look together.


Banana Pudding

Pudding:
3/4 cup sugar
1/3 cup cake flour
1/4 teaspoon salt
4 large egg yolks
2 cups whole milk
1/2 vanilla bean, split or 1/2 teaspoon vanilla extract
Freshly grated nutmeg
1/2 inch piece of cinnamon stick
Vanilla wafer cookies (good quality)
4 medium bananas, peeled and sliced

Topping:
4 large egg whites
1/4 teaspoon cream of tartar
5 tablespoons sugar
1/2 teaspoon vanilla extract

Pudding:
Bring 2 cups of water to boil in heavy bottomed saucepan over medium heat. In large stainless steel bowl, whisk together sugar, flour and salt. Whisk in egg yolks, followed by milk, vanilla bean, nutmeg and cinnamon. Place bowl over pan of water and cook, stirring until mixture is thick and coats the back of a spoon, 12-15 minutes. Remove from heat. Remove cinnamon and vanilla bean. Rinse vanilla bean and reserve for another use. If using vanilla extract, stir it in now.

While pudding is still warm, layer cookies, bananas and pudding in 1/2 pint canning jars or ramekins.

Preheat oven to 425 degrees.

Topping:
Whisk egg whites in electric mixer on medium speed until frothy. Add cream of tartar and slowly increase speed as egg whites become opaque. Add sugar 1 tablespoon at a time. Add vanilla extract. Whip until whites form a soft peak. Spoon meringue over warm puddings, sealing it to sides of jars.

Bake puddings for 4 minutes or until meringue is puffed and brown. Cool on rack for 20 minutes, then refrigerate for 2 hours before serving. Yield: 8 servings.

Wednesday, February 25, 2009

Cool Find.

I ran across Patricia Zapata's work while browsing her online store, A Little Hut which features unique hand-cut paper art, illustrations, calendars, and cute packaging. Patricia also owns and operates Zapata Design, and I am very excited that she has written a book called Home, Paper, Scissors which promises tons of DIY info and is available for pre-order now. I love the paper bowls on the front cover.

What caught my eye were the alphabet flash cards. The design is simple yet the illustrations are adorable. The best part is it is available for download for $8.00 which is a very affordable way to decorate a nursery. Check it out.


Tuesday, February 24, 2009

Baked Bundles of Joy

DIY & Food.

As a Hip Hostess, I believe that it is the little unexpected special touches in any event or evening that your guests will remember. One thing that I love to do is put together a pretty little package of treats as a parting gift. Who wouldn't like that? It combines two of my favorite things - pretty packaging and food. And the best thing is that it's super simple and cheap to make.

Mini Linzer Tarts in an Origami Favor Box.


Favor Box (originally from Martha Stewart Living).
1. Cut book weight paper to the following 2 sizes: 8 1/8" (for the bottom) and 5 13/16" (for the top).


2. Fold the corners of each square toward the center, using a bone folder or other thin blunt tool to make precise creases.


3. Fold one side of the bottom 1 1/4 inches toward the center; crease and unfold. Repeat for other three sides. Do same for lid, folding each side in 3/8" inch.


4. At each corner of bottom and lid, fold diagonal crease that bisects the small square created by previous folds.


5. Unfold the two opposite sides. Refold remaining two sides of square along crease so they stand upright and form two walls of box.


6. Fold up third side, tucking diagonal corner folds inward against it; wrap third side over folds; lay in place. Repeat for fourth side. Glue points together at the center.


Linzer Tarts

3/4 pound unsalted butter at room temperature
1 cup granulated sugar
1 teaspoon pure vanilla extract
3 1/2 cups flour
1/4 teaspoon salt
Ice water
3/4 cup good preserves, raspberry or strawberry look great
Confectioners' sugar, for dusting

Directions
Preheat the oven to 350 degrees F.
In the bowl of an electric mixer fitted with the paddle attachment, mix together the butter and sugar until they are just combined. Add the vanilla. In a medium bowl, sift together the flour and salt, then add them to the butter-and-sugar mixture. Mix on low speed until the dough starts to come together, you may have to add a little bit of ice water. Dump onto a surface dusted with flour and shape into a flat disk. Wrap in plastic and chill for 30 minutes.

Roll the dough 1/4-inch thick and cut 1 1/2-inch rounds with a cutter. With 1/2 of the rounds, cut a hole from the middle of each round with a heart or flower shaped cutter. Place all the cookies on an ungreased baking sheet lined with parchment and chill for 15 minutes.

Bake the cookies for 10 t0 12 minutes, until the edges begin to brown. Allow to cool to room temperature. Spread raspberry preserves on the flat side of each solid cookie. Dust the top of the cut-out cookies with confectioners' sugar and press the flat sides together, with the raspberry preserves in the middle and the confectioners' sugar on the top.

Monday, February 23, 2009

What is a Pummelo?

Food.

On Saturday night, my husband and I entertained one of our long time friends who is of Indonesian descent and has recently moved from NYC to Detroit. He mentioned that one of the things that he misses about NYC is the ease at which one can acquire foods from the East.

He specifically missed that Pummelo’s are in season now. When he said this I didn’t let on that I was completely baffled….Pummelo? But as any good host I started researching and below is what I discovered.

This round-to-pear shaped citrus fruit looks like a very large grapefruit but is sweeter, without bitterness. It's often firmer fleshed and less juicy than its more common relatives. Inside the smooth, golden yellow skin, the fruit is buried beneath a very thick layer of spongy white pith. Remove this layer, then peel away the thick membranes encasing each segment. The flesh may be pink or white, and its texture varies in different fruit. Sometimes it is so firm that the segments readily fall apart into separate juice sacs, or it may be almost as cohesive and juicy as a grapefruit.

We served the below salad as a first course and the result of the sweet, tart citrus, complementing the garlicky spinach was definitely a hit.


Sunkist Citrus Scampi
Serves 4

Ingredients:
12 Sunkist fresh orange segments
12 Sunkist fresh lemon segments
12 Sunkist fresh pummelo segments (use Sunkist grapefruit segments when the pummelos are not in season)
20 Raw, large shrimp, peeled, deveined, tails on
4 tablespoons Butter
4 tablespoons Olive oil
2 teaspoons Garlic, minced
8 cups Baby spinach leaves (Sunkist Citrus Scampi can also be served over 1 cup rice)

Procedure:
Take shrimp and butterfly them, slicing down the back and almost in half. This will make the shrimp curl when cooking.

Melt butter and olive oil in skillet over medium heat. Stir in garlic and shrimp.

Cook shrimp 4 - 5 minutes until they turn pink and tails curl.

Add Sunkist fresh orange, fresh lemon and fresh pummelo segments to pan, and stir gently to heat through.

Place baby spinach leaves on serving plate. Arrange shrimp on top of spinach. Pour garlic butter with Sunkist fresh orange, lemon and pummelo segments over shrimp.Serve immediately.

Saturday, February 21, 2009

Amuse Bouche

Food.

An amuse-bouche [uh-MYUZ-boosh] is a single, bite-sized hors d’œuvre. The word amuse-bouche is a French expression, literally translated “mouth-amuser”. And no wonder this appetizer is a snappy, single bite creation which combines intense taste sensations in an artistic form.

Amuse-bouche is different from your typical hors d’oeuvres. It is most often offered when guests are first seated at the table. Not only does this offer guests something to taste while waiting for the dinner but also sets the ‘flavor’ of the evening. The amuse-bouche should compliment the dinner, as well as, give guests a sample of the quality of the meal to come.

Amuse-bouche concentrates on flavor often combining simple, intense flavors alongside rich, multi-faceted ones. The focus is on savoring and appreciating the full flavor of a single bite, much as you savor the intensity of a shot rather than having a full cup. The amuse-bouche can be a combination of bite size, single ingredient bites arranged artfully on a plate or a combination of flavors offered as one serving on a Chinese spoon.

This is a hip way to start any event, no matter how large or how small. Check out this recipe provided by The Skinny Gourmet.

Friday, February 20, 2009

Southern Comfort

Table Decor.

While perusing the internet I ran across this great photo layout by D Magazine. The thing that struck me about this table was that I immediately wished I was seated around it with family and friends. A point that is often overlooked, the table setting should be more about the feeling you want to create for your wedding or event and less about the perfect $50.00 water goblet. The table below is put together very creatively using touches from around the home and natural textures. I love the chalkboard chargers ($12 each/RSVP Soirée) but you could also use inexpensive plates from a flea market or tag sale and cover them with chalkboard paint for the same effect. The sapling giveaways ($1.85 each/greenworldproject.net) are inexpensive, super cute and drive home the nature theme.


This is a great concept that can be easily adapted to any space or table size. Even if the beautiful rustic, country church was not in the background, your guests would imagine it there with this table setting.

Thursday, February 19, 2009

Gesundheit!

Beer.

Oh Regenboog Wostyntje! No, I did not just sneeze...I was just pining for another Beligian beer with which I have become smitten.

At a recent trip to the ultra-cool Huckleberry Bar in Brooklyn, I took a detour from their inventive cocktails towards their beer list and came up with another winner. The Regenboog Wostyntje is a Mustard Ale with a slight bitter finish. And don't let the "mustard ale" title scare you like it did for me at first...you won't take a sip of this and be thinking French's or Gulden's. Instead there is a slightly spicy note to it that would be perfect with a dinner of hearty meats - think bratwurst, sausage, steak. Add it to your grocery list, you'll love it!


Wednesday, February 18, 2009

Crib Creation

DIY.

The economy is in the tank and now you are spending a heck of a lot more time at home to save some cash. If you are going to be on a self-imposed house arrest, you might as well spruce up the place a bit. So today, we are going to do a little decorating DIY on a tiny budget.

In design, you can make bold impacts in many different ways - repetition, color, scale, etc. Today we're going to focus on scale. This is a sample of a piece of artwork that I created for my cosmopolitan crib, using a picture that I took of the street sign on our block:


All it takes is a little Microsoft Powerpoint know-how, a printer, and some foam core to make your own version. Here's how it's done:

1. Take a day to wander around your neighborhood or city, snapping detail shots of things that you love. It could be architecture, nature, furniture - whatever inspires you. **Note: most digital cameras have settings that allow you to choose higher resolution images. You will need to shoot the highest quality that you can.

2. Choose your favorite image.

3. Measure the portion of the wall that you want to work with so that you have a range of where you want the overall size to hit.

4. Using Microsoft Powerpoint, open up 2 different presentations.

5. Format the first presentation size so that it is the overall size that you want the picture to be (minus a couple of inches for the gaps between sections). Mine is 36"x36".

6. Insert the image into the large presentation. Resize it so that it fills the entire presentation area, you may have to crop the image a bit to make it fit eactly. Save. 7. Now, open the second presentation and format the size so that it equals the module of each section of the overall picture. Keep the module under whatever size sheet of paper you can print on your printer. In my case, I would do 9" x9" sections, because my Kinkos can print on 11x17 sheets of paper at no upcharge.
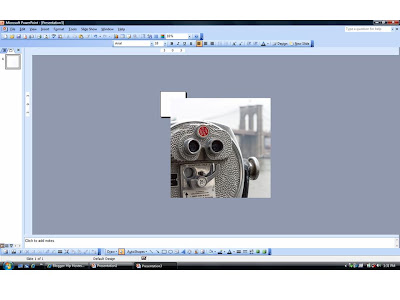
8. Go to Presentation #1 and copy the image. Go to Presentation # 2 and paste the image. DO NOT RESIZE the image. You may have to adjust the zoom so that you can see the entire screen best.

9. Move the image so that the upper left corner of the image lines up with the upper left corner of the presentation frame. Crop everything that doesn't fit into this box out of the picture.
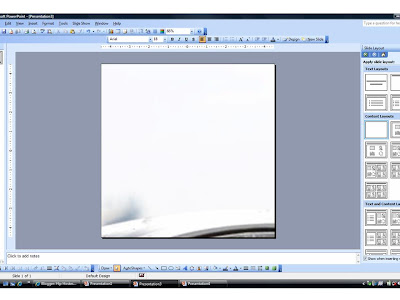
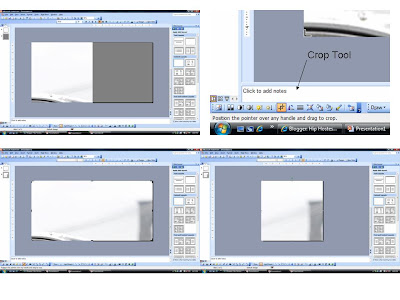


10. Now open a duplicate slide. Shift the image to the left so that the upper right corner of the image lines up with the upper left corner of the frame (I made the frame gray so that you could best see this). Using your crop tool, uncrop the right side of the image by dragging it across to the right side of the frame. You then go back to the left side of the image and use the crop tool to drag it to the left side of the frame. This will leave you with the second horizontal section.


11. Using this theory, repeat step #10 until you have a Powerpoint presentation that contains 1 slide for each section of your artwork. If you lose track of where you are in the overall picture, you can always refer back to Presentation #1 where you have it cropped and saved.
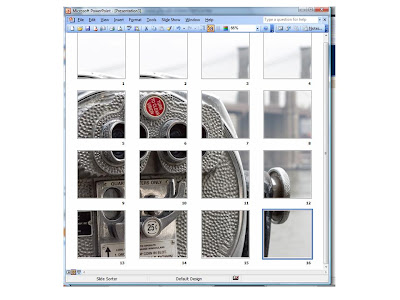

12. Print Presentation #2.
13. Mount these pages onto foam core using a glue stick or rubber cement.
14. Cut the foam core sections.
15. Hang on your wall leaving between a 3/4" - 2" gap between each section. Keep the gap uniform throughout. You can use heavy duty double stick tape to hang foam core.
16. Voila! Decorating Drama on a Dime.

NOTES:
In my apartment, I framed each section using record album frames. It isn't necessary if you are trying to keep to a strict budget, but it is an option.

When cutting the foam core, it is extremely important that you use a sharp blade. No need for a fancy cutting tool: just an Exacto knife, a metal straight edge, and a cutting board will suffice. Cut towards you, not away. You will have more control that way. Let the blade do the work for you - don't push down too hard. It should take 3 or 4 passes over a side to cut through. And you might need to change your blade once in between all of the cutting to keep it sufficiently sharp.